This is the South Side with the gorgeous windows.

This is the North Side for reference for later.

The shot of the south side doesn't really do the view, or the light justice. That said, the light in there without any sort of lighting is incredible. As I mentioned yesterday, we decided that among the things we would do ourselves, the windows were one. This is what the small windows looked like after hanging insulation and drywall.

Most of them had the bottom section of dry wall cut away down to expose the 2x4 under it which was actually a little easier to work with.
I figured, I've done framing, I've done set construction, this can't be hard. It is after all basic carpentry to install a window frame. I wasn't entirely correct in that assessment. At least, not all the way around. A friend of ours came up to help so I could do this more quickly and safely.
Let's start with the small windows. First thing we had to do was remove the windows, and caulk them. That was easy enough. If the window was particularly stubborn I simply put a pair of screws into it and used them as hand grips to pull it out. Then we caulked, and replaced each window in turn.
Then came the fun part. We measured a couple of the windows, and went out and got lumber to fit for all of them. We don't have a truck which made this a bit of an adventure, but doable. Just have lengths cut to fit what we will need. Fortunately, we had all of the cuts done with at least 1" over what we thought we would need. When we got back, we realized something unpleasant. The previous owner who had built the place himself had built the entire place off square. Having looked at it before, and even measuring it it wasn't apparent to me. Once we started using a square and a level to try to get everything perfect we started realizing there were substantial differences. That said, with a lot of sanding, and constant measuring we were able to get the frames in around the small windows, and even put sills in. Not perfect, but about as good as we could do with the tools we had. That's another post I should do, the right tools, and the tools you have.
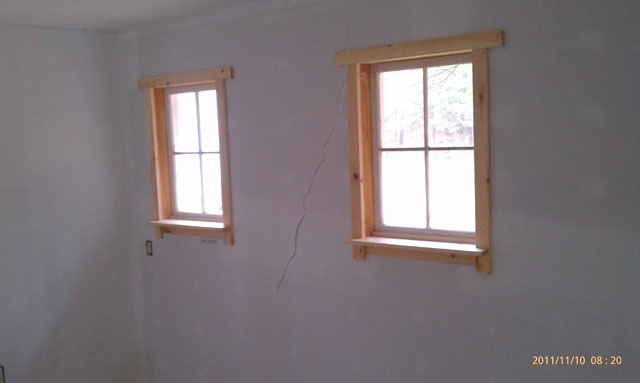
As you can see here though, even with all of the measuring it's not perfect. I am going to fill this in with wood putty before staining. This however is the consequence of not properly squaring everything when building. In the end, you end up with sloppy finish work.

Then came the big windows. Chronologically this came first, but impact wise it's a bigger deal. I found out that to properly seal in the big windows we would have to remove each one from where it sat, put in a clear sealant, replace it, and then put in the frame that it was lacking. This is really important so pay attention!
Glass Is Heavy!
We got this 5' by 5' window out of its frame with a bit of grunting and hard work. We thoroughly cleaned the dust from the installation of the drywall off of every surface we were going to be dealing with. We then put in the good thick bead of sealant (As a note, don't buy cheap window sealant. There is the 7.99, and the 3.99, get the better one.), and the sealant in place, we lifted the window to put it in. We got it up to level, and we realized something. It doesn't matter if you can lift it. You also have to comfortably control it. As soon as I attempted to do so to fit this monster in, I lost control of the window entirely, and couldn't even put it down, I dropped it. We got very lucky, it didn't break, the seal didn't break, it was ok.
The same can't be said for the floor. The picture I took doesn't show that there is a good 1/2" gouge in the floor. This is another presentation of use the right tools it seems. I went down and borrowed a pair of glass lifting suction cups, and then with a third person helping guide the 300+ pound monster in, put it in place. This isn't where the adventure ends and we put in the frame. This is where things get odd. Where the small windows were off in "Man, that's annoying" sorts of ways, the big window was off in important ways. Once we got it on the sill and in the right place, we couldn't fit it back into the spot it fit in. We couldn't fit it in even without the shock pads you should have below all big windows! We tried shimmying it, shifting, pushing, none of it worked. In the end, to put the window in we had to use a rubber mallet and a piece of 2x6 to spread the impact and hammer on the pane of the window to push it into place.
That done, we cut and installed 2x6 window frames for each of the windows, not making the mistake of removing the other two windows. They don't look great yet, but they aren't done. They will be soon. That said, the fact that those are 2x6s gives you a sense of scale on that window doesn't it?

In the end I guess what this post is about is as much, using the right tools and squaring when ever you build, at every step. If you don't it is much harder for you, or the people coming after you, to make things right. As someone coming in behind, working after someone elses shoddy work is really unpleasant. It is also a really important thing to note that some of the biggest problems in a new house that you haven't built yourself can't be seen with the naked eye and will only be seen when you are trying to work with the property in the future.
That said, we're getting close to done with the space, and I can't wait for it to be done so I can show it off. I'm also proud of the work we did get done on the windows despite the difficulties.
Hi there! So, I stumbled upon this wonderful blog quite by accident... but then I realized - Hey! I know this guy! I'm Shannon... I used to be roomies with Krys & Ross in Ayer. And I remember you very clearly, and I enjoyed all the conversations we had! I knew you'd go and do some cool things with your life, and it appears I predicted correctly! I love what you're doing with this house and your lifestyle. And I hope you don't mind me following your blog to watch the progress!
ReplyDeleteBest of luck!
- Shannon
Hey there Shannon, great to hear from you again. Glad you found the blog, and I'm flattered that you'd want to follow and watch what we're up to. Hope that life is treating you well.
ReplyDeleteCoureton